Reading guitar scales can be very overwhelming for beginner guitarists, especially because they look identical to guitar chord diagrams. However, even though they look similar, the concept of reading them is very different.
You will first determine where the pattern is laid out on the fretboard. Using the correct fingers, you will then begin playing the first note on the 6th string and each subsequent note on that string. Then you will make your way down all the strings and notes and then reverse the pattern.
This article will detail precisely how to read any guitar scale diagram and allow for differentiation between ones drawn differently. It will also discuss how to shift guitar scale patterns up and down the fretboard.

Table of Contents
How To Read Guitar Scales
If you are planning on playing lead guitar, no matter the genre, then you will need to be able to read and play scales. Scales are basically groups of notes that, when associated with each other, provide you with a specific type of sound.
The most common scale is the Major scale. This scale provides a bright and happy sound. Other scales, for example, the Harmonic Minor scale, will give a somewhat Spanish sound, but with slight overdrive, it will take you into the realm of neoclassical metal.
Now, there are many scales, and there are actually scales within scales (modes), but that is beyond the scope of this article. You can get a guitar theory book if you want to take your learning one step further!
Our main concern is to be able to understand how to read scales because essentially, no matter the scale, the layout and drawing are always the same. Thus if you learn how to read one scale, you can read them all.
How To Read Guitar Scales – Tutorial
When looking at a guitar scale, there are a few things you will need to consider.
These include the diagram orientation, where to begin, which strings are which, and what scale it is. You will also need to determine the root notes, how the scale is made, and what fingers to use.
Sample Guitar Scale Diagram
Below is an example of a guitar scale commonly found in the guitar world today. Throughout the article, we’ll be referring to this diagram so feel free to scroll back for reference!
Determining Scale Diagram Orientation
The first thing you will need to consider is the diagram’s orientation. As with guitar chord diagrams, they can be laid out horizontally or vertically. In both cases, you will read them exactly the same way.
You can technically take a horizontal scale diagram and turn it 90 degrees clockwise to produce a vertical scale diagram. Conversely, you can take a vertical scale diagram and turn it 90 degrees counterclockwise to produce a horizontal scale diagram.
In all aspects, both scale diagrams and how you will read them are identical. The example scale above is a horizontal scale diagram.
Determining Which String Is Which
The next thing you will need to figure out is what string is the low E string on the diagram. This is because you will, more often than not, always learn and start your scales on the low E string (the 6th string).
For a horizontal scale diagram, the low E string is the bottom line that runs horizontally. The top line will be your high E string (the 1st string).
For a vertical scale diagram, the low E (6th string) will be the vertical line on the left side of the diagram. The vertical line on the right side will be your high E string (the 1st string).
Depending on the diagram, you will read it accordingly and understand where the 6th string (low E string) is.
Determining Where On The Fretboard You Are
Following that, you will need to understand where on the fretboard you are. It is essential to understand that scales can be played all over the neck of the guitar, and depending on where on the fretboard you start, the scale will be in a different key.
Depending on the scale diagram you are looking at, they can be very different. Some will literally just be boxes with the scale patterns and no other indicators.
In a situation like this, you must understand that the diagram and scale do not represent any one place on the fretboard, and in this situation, it suggests that you can play it anywhere you like.
As we said, depending on where you start on the fretboard, that scale will be in a different key, but we will get into this later.
Some diagrams will have indicators such as numbers above or below the high E or low E strings. In this situation, it will represent the frets.
You may also see the dot inlays on some diagrams along with the nut. The nut will be a thick line compared to the strings drawn perpendicular to them. Thus the first fret will be directly after the nut. You may also find the dot inlays that you get on a guitar drawn onto the diagram.
You should know that the dot inlays refer to the 3rd, 5th, 7th, and 9th frets. The double dot inlays refer to the 12th fret.
By examining the diagram and looking out for these factors, you can determine which part of the guitar fretboard the diagram is indicating.
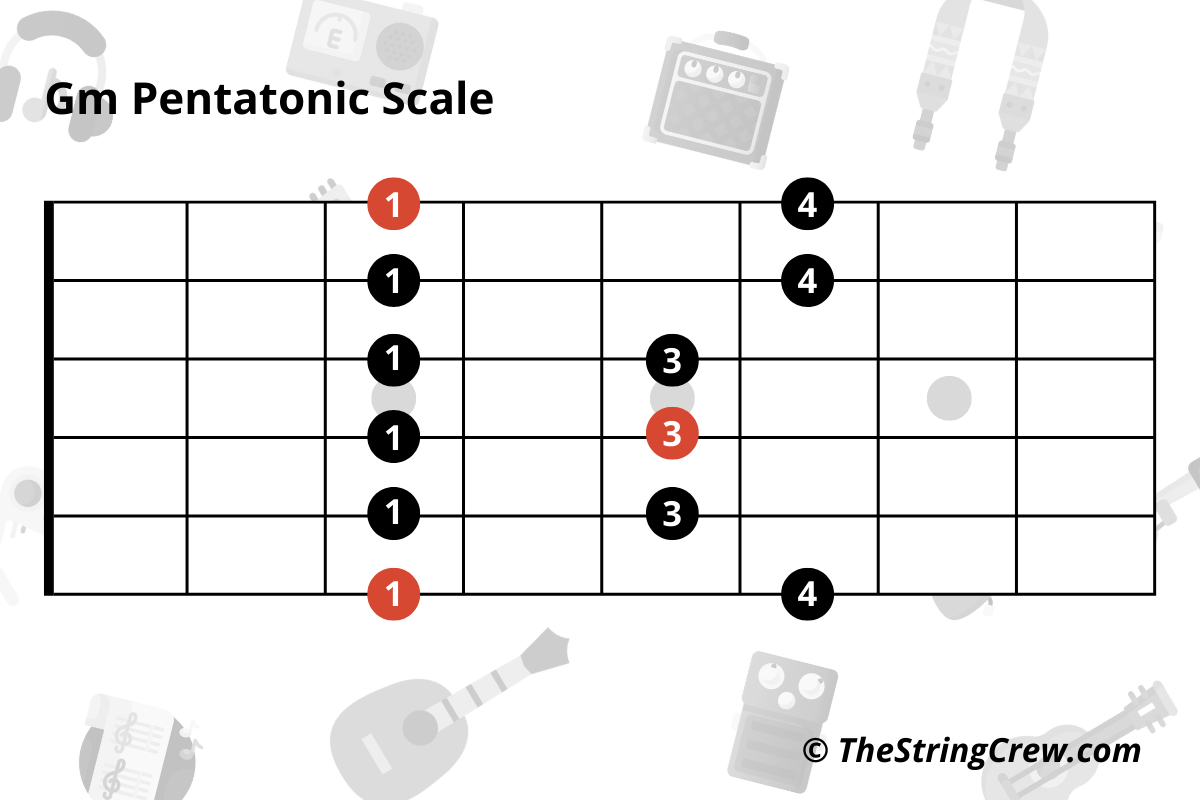
For the example scale above, the thick “nut” vertical line is on the left and the dot inlays are at the 3rd, 5th, and 7th frets. So, now you know where this scale is being played on the fretboard.
What Do The Circles Mean?
The circles are the physical representation of the scale. Take note that, unlike a guitar chord diagram, where the circles represent a notes played in a chord (and you will fret all the circles simultaneously) a scale diagram is somewhat different.
Scales are played one note at a time from beginning to end and then back again, but the only way to represent a scale in a diagram is to draw all the notes at once, which essentially outlines the scale shape.
It will help if you remember that memorizing the shapes of scales is essential; this is how you will be able to shift, play, and improvise on the fly.
What Do The Numbers Mean?
Depending on how the scale diagram is drawn, the circles may contain numbers within them. Other times, you may have actual notes, and then in some situations, you may have the scale degrees.
The most common is to find numbers within the circles. These numbers represent your fretting hand fingers.
| Number | Finger |
| 1 | Index |
| 2 | Middle |
| 3 | Ring |
| 4 | Pinky |
Hence, when you see a circle with a one in it, you must know that when you play that note, you should be playing it with your index finger. When you see a circle with a four in it, you should play that note with your pinky finger and so on.
You can see that in the example Gm scale above, only your index, ring, and pinky should be used for proper scale playing technique.
In cases where you have the actual names of the notes or the degrees of the scale, you can use this rule of thumb to figure out which fingers to use:
- You can start the scale using your index finger and then subsequently use one finger per fret. If a note is three frets away, you will then use your pinky finger to play that note.
Take note that depending on the scale and pattern, you may have to shift your hand up or down the fretboard. For scale patterns like this, when you jump to the next string just remember to shift your hand so that the first note is played with your index finger.
Determining Where To Begin
Now when you read a scale diagram, you should be able to determine the shape, the fingering, and where it is on the fretboard. These are the essential aspects you need to understand to determine where to begin.
Once you have all this information, you will actually need to start playing the scale and know where to begin.
As we said, you typically start a scale on the 6th string (the low E string – the thickest string). You will begin there and start with the first circle indicating the first note in the scale.
How To Actually Play The Scale
It is critical that you understand the previous headings and explanations to know where to begin and how a scale diagram is drawn.
Once you know all these factors, you can actually begin to play and memorize the scale.
What you will do (for the example scale in this article) is start with your index finger and play the first note (first circle). You will then look at the next note on the same string (the low E string) and play it with the subsequent finger.
Take a look at our example above. The horizontal scale diagram shows a G Minor Pentatonic scale that starts on the 6th string 3rd fret. The first circle indicates that you must play that note with your index finger, and the second note (second circle) indicates that you should play the next note with your pinky finger.
Once you have played these notes one after the other, you will move to the next string (the 5th string) and continue playing the notes in the same fashion.
The next string indicates that you must play the first note with your index finger and the second note with your ring finger. The two subsequent strings (the 4th and 3rd strings) indicate playing these strings and notes in the same way.
Once you have played these strings, you will move to the second string, where you will play the first note with your index finger and the second with your pinky. This is the same for the first string.
You should now have played the entire scale note after note (two notes per string), moving down each string from the 6th until you reach the last note on the first string using the correct fingers.
At this point, you will need to reverse the scale and play the notes in reverse using the exact same fingering and positioning of your hand.
You will methodically move back up the scale in reverse until you reach the initial note (6th string 3rd fret note) that you started on.
To sum up, this is how you read and play a guitar scale diagram:
- You will start on the 6th string first note
- Play all the following notes on the string
- Then move to the following string.
- Do this until you have reached the first string, and then you will reverse the pattern and play it backward all the way to the beginning.
Take note that some scales have three notes per string, and some patterns will make you start the scale with a different finger. It will all depend on the scale and the scale pattern.
How To Determine What Scale You Are Playing
It is all good and well being able to read and play a guitar scale, but if you don’t know how to put it into context, it is as useless as a heater in the summertime.
Thus, you need to understand what scale you are playing and how to shift it into various keys. It will help if you remember that all closed-shaped guitar scale patterns are moveable across the neck of the guitar.
This means if you play a Minor pentatonic pattern (like the one we just discussed, shown above) or any other pattern and you know how to move it along the fretboard, you will be able to play that Minor pentatonic pattern in any key.
To determine what scale you are playing is to understand the degrees to which the scale is made from the root note, and that is a bit beyond the scope of this article.
However, memorizing a pattern and shifting it into any key is pretty simple to do. You should learn scale patterns where the root note starts with your index finger. The Gm pentatonic we used as our example is a scale that has its starting (root) note based on the index finger.
If you know the notes on your 6th string, then shifting this pattern would be simple enough. For example, if you have to shift this pattern up to the 5th fret and start by playing the first note on your 6th string 5th fret, it will become an Am pentatonic pattern.
If you have to shift it to the 12th fret, it will become an Em pentatonic pattern (the 12th fret 6th string is an E note). It’s as simple as learning the notes on your 6th string and then just shifting the pattern into place.
Conclusion
Understanding how to read and play a guitar scale diagram can be pretty tricky if you do not understand the basic concepts. For the most part, beginner students typically get it confused with that of a chord diagram.
Chord diagrams indicate the chord’s shape and to play (or mute) all the notes simultaneously. However, a scale diagram indicates the pattern and to play the notes individually, one after the other and then back again.
As always, Happy Playing,
-D